Labels

Tuesday, December 19, 2017

Angular Explained...

Release Versions: Link
  • Angular JS: 2009
  • Angular 2: May 2016
  • Angular 4: Mar 2017 (To prevent conflict with router package version, skipped version 3)
  • Angular 5: Nov 2017
  • Angular 6: May 2018 
  • Angular 7: Oct 2018 
  • Angular 8: May 2019
  • Angular 9: Feb 2020 - Moved all applications to use the Ivy compiler and runtime
  • Angular 10: Jun 2020 
  • Angular 11: Nov 2020
  • Angular 12: May 2021
  • Angular 13: Nov 2021
Angular JS vs Angular 2:
  • In 2009, AngularJS with Javascript, In 2016, Angular 2 with TypeScript & Dart
  • In addition to tighter integration with Typescript, Angular 2 promises a better performance (5-10 times faster). Rationale 
    • Heavy Loading At Client Side:
      • Typically, 90–95 percent of the application code runs in the browser. Only when the user needs new data or must perform secured operations such as authentication; work goes to the server. 
      • Because dependency on the server is mostly removed, it increase server availability. 
      • No matter how many users access the server simultaneously, 90–95 percent of the time the app's performance is never impacted. 
      • Also, because most of the load is running on the client, the server is idle most of the time. 
      • Low demand on server resources reduces stress on the server significantly, potentially reducing server costs.
    • Seperate Layers: Application Layer and Rendering Layer
      • Rendering performance is substantially improved in Angular 2. 
      • Most importantly, the fact that the rendering module is located in a separate module allows you to run the computation-heavy code in a worker thread. 
      • Keeping the rendering engine in a separate module allows third-party vendors to replace the default DOM renderer with one that targets non browser-based platforms. 
      • This allows reusing the application code (TypeScript Code Class) across devices, with the UI renderers for mobile devices that use native components.
      • I.e. Code of TypeScript class remains the same, but the content of the @Component annotation will contain XML or another language for rendering native components. 
  • No more battling standards between html5 compliant data-ng-click or the short and sweet ng-click, they are replaced by (click) attribute with parentheses around it.
  • Angular 2 is entirely Component-based UI & Service/Controller compared to Angular v1 MVC approach. Controllers and $Scope are replaced by Components and Directives. Also added Modules, Services, Routes etc. 
  • This helps dividing applications in terms of components with desired features which helped to improve the flexibility and reusability as compared to Angular v1.0 
  • Mobile Support: Angular 2.0 has made it possible to accomplish the native applications for a mobile platform like React. 
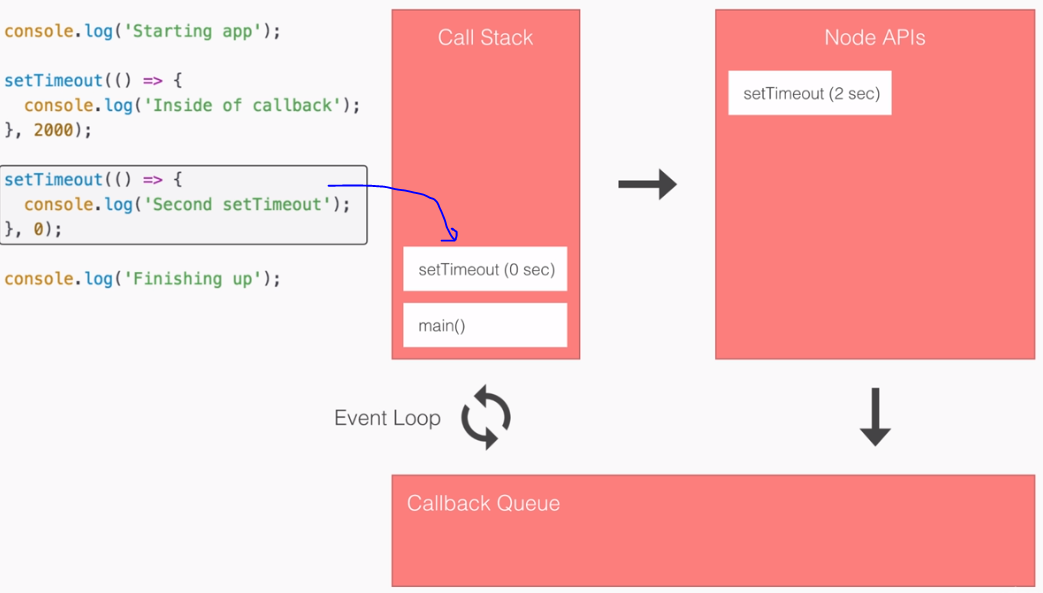
  • SPA: Angular2 builds Single Page Applications : SPA technology is generating high interest in the software industry because of its potential for better-performing browser and smartphone applications. 
    • If you want to see a Single Page Application in action, click https://angular-university.io and start clicking on the home page on the list of latest courses, and on the top menu.
    • If you start navigating around, you will see that the page does not fully reload – only new data gets sent over the wire as the user navigates through the application – that is an example of a single page application.
    • Advantages
      • Production Deployment - A SPA is super-simple to deploy if compared to more traditional server-side rendered applications: it's really just one index.html file, with a CSS bundle and a Javascript bundle. Of course the application will need to make calls to the backend to get its data, but that is a separate server that can be built if needed with a completely different technology: like Node, Java or PHP.
      • Versioning & Rollback: All we have to do is to version our build output (that produces the CSS and JS bundles).
      • Best User Experience :
        • Avoid the constant full page reloads as in traditional web application.Thus much-improved user experience due to less full page reloads and a better overall performance because less bandwidth is needed.
        • On a SPA, after the initial page load, no more HTML gets sent over the network. Instead, only data gets requested from the server (or sent to the server).
        • So while a SPA is running, only data gets sent over the wire, which takes a lot less time and bandwidth than constantly sending HTML
    • More details about SPA is here 

SPA & Angular 2:
  • An SPA renders only one HTML page from the server, when the user starts the app. 
  • Along with that one HTML page, the server sends an application engine to the client. I.e.
    • In a SPA after application startup, the data to HTML transformation process has been moved from the server to the client – SPAs have the equivalent of a template engine running in your browser 
  • This engine controls the entire application including processing, input, output, painting, and loading of the HTML pages. 
  • Typically, 90–95 percent of the application code runs in the browser; the rest works in the server when the user needs new data or must perform secured operations such as authentication. 
  • Because dependency on the server is mostly removed, an SPA autoscales in the Angular 2 environment. 
  • No matter how many users access the server simultaneously, 90–95 percent of the time the app's performance is never impacted.

What is Angular 2?
  • Is a client-side JavaScript MVC framework to develop a dynamic single-page web application. 
  • Angular is a TypeScript-based Open-source Front-end Web Application Platform led by the Angular Team at Google.
  • Angular was originally started as a project in Google, but now it is an open source framework.

What is Advantages of Angular 2?
  • There is many more advantage of Angular 2.
  • The Angular 2 has better performance as explained above (Heavy Loading At Client Side, Separate Application & Rendering Layer)
  • The Angular 2 has more powerful template system.
  • The Angular 2 provide simpler APIs, lazy loading and easier to application debugging.
  • The Angular 2 much more testable.
  • The Angular 2 provides to nested level components.
  • The Angular 2 execute run more than two programs at the same time

Angular 2 Major Building Blocks:
  • Module 
    • Angular applications are modular. Every Angular application has at least one module— the root module, conventionally named AppModule. 
    • As the developer, it's up to you to decide how to use the modules concept. Typically, you map major functionality or a feature to a module. 
    • Let's say you have five major areas in your system. Each one will have its own module in addition to the root module, totaling six modules.
  • Component - 
    • A component controls a patch of the page, called a view.
    • A component contains a class, a template, and metadata. A template is a form of HTML that tells Angular how to render the component. A component can belong to one and only one module.
    • All of the components that are used must be made known via bootstrap. They also have to be imported on the page.
  • Services/Observable Services
    • A service provides any value, function, or feature that your application needs.
    • Components are big consumers of services. Services are big consumers of microservices.
  • Routes:
    • Routes enable navigation from one view to the next as users perform application tasks. 
    • A route is equivalent to a mechanism used to control menus and submenus.
  • Component Interaction (Using @Input & @Output)
  • Template
  • Data Binding
  • Directive
  • Dependency Injection
  • Pipes
  • Guards (To guard Route/Child Route)
  • Resolvers (To load object, before route is activated) 
  • AOT (Ahead of Time Compiler)
    • Faster Rendering
    • Smaller Angular Framework download size (typically vendor.ts)
    • Better Security (becoz of no html download which reduceds possibiltity of HTML Injection)
    • Early Template Errors detection
    • Fewer Async Calls to Server

Angular 4 - Updates & New Features:

  1. View Engine With Less Code - Reduced it’s bundled file size by 60%. - The code generated is reduced and has accelerated the application development. Here the developed code can be used for prod mode and debug.
  2. ngIf with a new else statement -
  3. Template - 'ng-template' tag will be utilized rather than the just 'template' 
  4. Http: Adding search parameters to an HTTP request has been simplified.
  5. Pipes: Angular 4 introduced a new pipe -  titlecase : It changes the first letter of each word into uppercase.
  6. More  compatible with newer versions TypeScript 2.1 and TypeScript 2.2. This helps with better type checking and also enhanced IDE features for Visual Studio Code.
  7. Router ParamMap -
    1. Before, simple object structures used to store route parameters -  These Parameters were assessed by simple standard JavaScript syntax : (parameterObject[‘parameter-name’] )
    2. But now in Angular 4, these parameters are available as a map. To use these parameters simple methods are called - (parameterMap.get(‘parameter-name’))
  8. Module-ID Removed: Used to resolve relative paths for your stylesheets and templates. Angular4 added a new SystemJS plugin (systemjs-angular-loader.js) to SystemJS configuration. This plugin dynamically converts "component-relative" paths in templateUrl and styleUrls to "absolute paths".
  9. Animation Package Seperated - Animation functions were provided as a part of @angular/core module (whether you need or not). Now animation is part of a separate package. This has eliminated the unnecessary bundles with large sized files.
 Reference: Link1, Link2 

Angular 5 - Updates & New Features:
  1. TypeScript 2.4 support  - String-based Enums, Weak-Type-Detection (Types are weak if they only own optional parameters) etc.
  2. Forms - Earlier validation is performed potentially with every keystroke - Thus worse performance. Now you can specify when validators should be executed in forms.  You can select change, which specifies the previous behavior, submit or blur.
  3. HttpClient -  Introduced with Angular 4. Now supports a parameter object for headers and parameters.
  4. Router - Extended with additional events. E.g., show progress when a route is changed. The corresponding events are ActivationStart and ActivationEnd or ChildActivationStart and ChildActivationEnd.
  5. Animations - Extended with several syntax ingredients. It is now possible to respond to numerical value changes by using :increment and :decrement in order to animate according transitions. 
Reference: Link1 

Angular 6 - Updates & New Features:
  1. Ivy – The New Rendering Engine (Third Engine so far).  Only noticeable thing is application being more nimble and responsive.
  2. Locality - Locality allows for more flexibility, and the Angular 6 updates mean that developers no longer have to tediously compile a specific library into an AOT.
  3. Tree Shaking - Tree shaking is a tool for optimizing the building process. It attempts to prevent unused lines of code from ending up in the final product. The Ivy renderer greatly improves the tree shaking process. Instead of making use of an interpreter, the new renderer will create template information directly. What this means is that bundles are much smaller and startup time should be super fast
  4. ng update -  Feature that allows for automatic updates of Angular dependencies in the package.json file. The ng update is an attempt to improve bug detection, updating the code without manual command.  (e.g. ng update @angular/core) 
  5. ng add - Provides you a seamless way to add new functionalities to an application.It works the same as npm, but it doesn’t replace it.  (e.g. ng add @angular/elements) 
  6. TypeScript 2.7 & RxJS 6 - Angular 6 now depends on TypeScript 2.7 and RxJS 6. RxJS 6 has new and simpler import paths and gets away with chainable operators in favor of pipeable operators. This makes the library as a whole more tree-shakable and will result in smaller bundles. RxJS 6 contains some breaking changes, but a new package, rxjs-compat, can be installed alongside RxJS 6 to provide a compatibility layer while upgrading your code to the new syntax.
Reference: Link1, Link2

Angular 7 - Updates & New Features:
  1. Updates regarding Application Performance
  2. Angular Material & CDK,
  3. Virtual Scrolling,
  4. Improved Accessibility of Selects, 
  5. Content Projection using Web standard for custom elements, 
  6. Dependency updates regarding Typescript 3.1, RxJS 6.3, Node 10

Angular 8 - Updates & New Features:
      1. Featuring Differential loading for all application code, 
      2. Dynamic imports for lazy routes, 
      3. Web workers, 
      4. TypeScript 3.4 support, 
      5. Angular Ivy as an opt-in preview - Includes Below
        • Generated code that is easier to read and debug at runtime
        • Faster re-build time
        • Improved payload size
        • Improved template type checking
        • Backwards compatibility
              Angular 9 - Updates & New Features:
              1. Moved all applications to use the Ivy compiler and runtime by default. 
              2. Angular has been updated to work with TypeScript 3.6 and 3.7. 
              3. In addition to hundreds of bug fixes, the Ivy compiler and runtime offers numerous advantages:
                • Smaller bundle sizes
                • Faster testing
                • Better debugging
                • Improved CSS class and style binding
                • Improved type checking
                • Improved build errors
                • Improved build times, enabling AOT on by default
                • Improved Internationalization
              Angular 10 - Updates & New Features:
              1. New Date Range Picker (Material UI library)
              2. Warnings about CommonJS imports
              3. Optional Stricter Settings
              4. Keeping Up to Date with the Ecosystem
              5. New Default Browser Configuration
              6. Deprecations and Removals
              Angular 11 - Updates & New Features:
              1. Available With Typescript 4.0, Webpack 5
              2. Updated Hot Module Replacement (HMR) Support
              3. Updates on Operation Byelog
              4. Automatic Inlining of Fonts
              5. Component Test Harnesses
              6. Updated Language Service Preview
              7. Faster Builds
              8. Experimental Webpack 5 Support
              9. Moving to ESLint.
                          Angular 12 - Updates & New Features:
                          1. Available With Typescript 4.2, Webpack 5
                          2. Ivy Everywhere: Angular v12
                          3. Migrating from legacy i18n message IDs
                          4. Protractor: planning for future
                          5. Nullish Coalescing
                          6. Improvements in styling
                          7. Deprecating support for IE11

                                    Angular CLI over WebPack:

                                    A bundler is software that bundles your application code along with its resources into a minimized, zipped bundle that can be easily deployed on the server.
                                    There are many bundlers out there, most widely used are Grunt, Gulp and lately, Webpack.

                                    While Grunt and Gulp simply bundle all js files and all assets, Webpack does extra:
                                    •  Maintains a dependency tree (by scanning import statements) and that allows it to only bundle resources and js files your code actually uses, 
                                    •  Identify chunks of code – using code splitting – and bundle chunks together for a more efficient bundle.
                                    The angular team went the extra mile and created Angular-CLI – a very powerful tool that goes way beyond the simple bundler or generator.
                                    • It has Webpack under the hood, already pre-configured, so you enjoy the benefits without the hassle of configuration.
                                    • It is very easy to use with a set of cli commands, the main ones are:
                                      • ng new – create a new angular-cli enabled project
                                      • ng init – initialize the current project for angular-cli
                                      • ng test – run all unit tests (using karma/jasmine stack)
                                      • ng e2e – run all protractor e2e tests
                                      • ng serve – will run your app in a local web server
                                      • ng build – will compile TypeScript code, bundle the dependency tree and dump it to the dist folder.
                                      • ng build --prod – will also minify, zip, hash etc.
                                    • It comes with a code generator – you can use it to create skeletons of the most common ones (Components, Directives, Services and Pipes) by simply using the cli command ng g .

                                    Reference: Link1


                                    TypeScript:
                                    • TypeScript is a form of JavaScript which knows types and classes and  can be compiled to JavaScript. 
                                    • It is open source. TypeScript includes many aspects of object orientation such as Lambdas, Iterators, Inheritance, Generics, Interfaces etc.
                                    • TypeScript is an extension of ECMAScript, in fact: TypeScript = ES6 + Types + Annotations
                                    • TypeScript is a superset of ECMAScript 6 (ES6), and is backwards compatible with ECMAScript 5 (i.e.: JavaScript)
                                    • In previous versions of ECMAScript, everything was still defined by a JS prototype. Now classes are defined and it makes it almost as readable as Java code. 
                                    • TypeScript is actually from Microsoft, which means the new Angular is also likely to be popular for .NET developers. 
                                    • TypeScript Concepts
                                      • Variables
                                      • Let vs Var
                                      • Const
                                      • Functions
                                      • Overloading
                                      • Arrays
                                      • Destructuring
                                      • Type Guards
                                      • Type Assertions
                                      • Tuple
                                      • Interfaces
                                      • Classes
                                      • Static vs Read-only
                                      • Generics
                                      • Inheritance
                                      • Namespace
                                      • Module
                                    Angular Learning:


                                    •  ngOnChanges: Called after a bound input property changes
                                    •  ngOnInit: Called once the component is initialized (After Constructor)
                                    •  ngDoCheck: Called during every change detection run
                                      •  ngAfterContentInit: Called after content (ng-content) has been projected into view
                                      •  ngAfterContentChecked: Called everytime the projected content has been checked
                                      •  ngAfterViewInit: Called after the component's view (& child views) has been initialized
                                      •  ngAfterViewChecked: Called everytime the component's view (& child views) has been checked
                                    •  ngOnDestroy: Called once the component is about to be destroyed

                                    Ref:
                                    • https://magenic.com/thinking/angular-2-vs-angularjs-1-which-to-choose
                                    • https://www.angularminds.com/blog/article/comparison-difference-between-angular1-vs-angular2-vs-angular4.html
                                    • https://dzone.com/articles/typed-front-end-with-angular-2
                                    • https://www.code-sample.com/2016/06/angular-2-interview-questions-and.html
                                    • With Code:
                                      • https://www.infoq.com/articles/Angular2-TypeScript-High-Level-Overview
                                      • https://www.ibm.com/developerworks/library/wa-implement-a-single-page-application-with-angular2/index.html

                                    Hope this helps!!

                                    Arun Manglick

                                    Saturday, December 2, 2017

                                    Node.JS & EventLoop Explained..

                                    Overview:
                                    • Node.js is a Server-Side platform developed by Ryan Dahl in 2009 for easily building fast, scalable network applications. 
                                    • Node.js is a JavaScript Runtime or platform which is built on Google Chrome’s JavaScript v8 engine. This runtime allows executing the JavaScript code on any machine outside a browser (this means that it is the server that executes the Javascript and not the browser).
                                    • Node.js = Runtime Environment + JavaScript Library
                                    • Nodde.js built on Chrome’s JavaScript Engine (V8)  and designed with a Non-blocking, Event-driven I/O. 
                                      • Note: Its Non-blocking I/O is due to its use of asynchronous functionality, which keeps the server away from waiting on data to be returned before being able to move on to other tasks.
                                      • Note: Below are JavaScript Engines for different browsers that run the JavaScript of web pages.
                                        • Chrome : V8.
                                        • Firefox : Spidermonkey
                                        • IE: Chakra
                                        • Safari : JavaScriptCore 
                                    • Node.js is also cross-platform, able to be run on Windows, Linux and OS X. 
                                    • Node.js uses an Event-Driven, Non-Blocking I/O model that makes it lightweight and efficient, perfect for data-intensive real-time applications that run across distributed devices.
                                    • Node.JS packaging eco-system is the largest eco-system of open libraries in the world.
                                    • Node.js is an open source, cross-platform runtime environment for developing server-side and networking applications built on Google Chrome's JavaScript Engine (V8 Engine).

                                    Why Node.JS (Reasons to use NodeJS)
                                    • Speed: Node.js is a JavaScript Runtime that uses the V8 Engine developed by Google for use in Chrome. V8 compiles and executes JavaScript at lightning speeds mainly due to the fact that V8 compiles & translates JavaScript code into more efficient machine code instead of  bytecode or any intermediate code.
                                    • Larget Eco-System: npm is the Node.js package manager having collection of more than 3.5 lacs of packages and it is excellent.
                                      • Note : Node Package Manager (NPM) makes it easy to install packages that others have developed to perform any number of tasks. This helps to encourage code-sharing among developers and to reduce the amount of custom development that has to be done when one or more packages can take care of that coding for you.
                                    • One Language: It runs Javascript, so you can use the same language on server and client, and even share some code between them (e.g. for form validation, or to render views at either end.)
                                    • Single Threaded & Event Driven : The single-threaded event-driven system is fast even when handling lots of requests at once, and also simple, compared to traditional multi-threaded Java or ROR frameworks.
                                    • Real-time, Made Easy with Websockets: Node.js is a great platform for creating real-time apps. With a module such as Sockiet.io, you can create real-time chats, games and more. Socket.io is one of the most popular websocket libraries in use, and makes collaborative web applications dead simple.
                                      • Note:  Websockets are simply two-way communications channels between the client and server. So the server can push data to the client just as easily as the client can. 
                                    UseCases:
                                    • APIs based Applications
                                    • I/O bound Applications
                                    • Streaming Data
                                    • A Real-time Applications like online games, collaboration tools and chat rooms etc.
                                    • Single Page Applications
                                    • JSON based Applications
                                    • PROXY Applications


                                    Node.JS Drawbacks:
                                    • Callback Hell: In Node.JS everything is asynchronous by default. This means you are likely to end up using tons of nested callbacks, which can cause multiple issues (like Debugging, Error Handling, Error Stacks etc.). Nevertheless, there are a number of solutions to this problem, e.g. async/await. Well this problem is specific to JavaScript, not Node.JS.
                                    • Event Loop: While the event loop is one of its' largest advantages, not understanding how this works is one of its' biggest disadvantages as well.  Do *NOT* do long running, synchronous, cpu bound logic in Node.js.  Instead spin it off to a worker queue, another thread/process (use a pool), or any number of other ways to remove the heavy lifting from your main event loop.
                                    Few Testimonials:
                                    • Paypal: Node.js and an all Javascript development stack helped PayPal bring efficiencies in engineering and helped rethink and reboot product, design and operational thinking.
                                    • Uber: Uber used Node.js from the beginning, and its distributed system was a perfect fit, since a lot of network requests are made. The non-blocking asynchronous I/O used by Node.js helped to ensure those requests could be made and handled quickly to provide the best service possible.
                                    jQuery vs Angular vs Node.Js:
                                    • jQuery (Client Side): Is a Library: Is a fast, small, lightweight, "write less, do more", and feature-rich JavaScript library - HTML document traversal and manipulation, event handling, animation et
                                    • Angular: (Client Side) : Is a client-side JavaScript MVC framework to develop a dynamic single-page web application. Angular was originally started as a project in Google, but now it is an open source framework.
                                    • Node.JS (Server-Side): Is an open source, cross-platform runtime environment for developing server-side and networking applications built on Google Chrome's JavaScript Engine (V8 Engine).

                                    Node JS Event Loop:


                                    Node.JS - CallStack, CallBack & Event-Loop:

                                    Consider below code-snippet and see Node.js Event-Driven, Non-Blocking Model works:

                                    console.log('Starting App')
                                    setTimeout(() => {
                                      console.log('First Callback 2000ms');
                                    }, 2000);
                                    setTimeout(() => {
                                      console.log('Second Callback 0ms');
                                    }, 0);
                                    console.log('Finisihng App')

                                    Step1:

                                    1. First thing happens here is: main() statement is loaded in CallStack and kick-offs the execution.
                                    2. Next the very first statement is loaded in CallStack and removed after execution.
                                    3. Next statement loads in CallStack. But as this is a Node API and not available in V8 engine, moves/registers to Node API section and finally gets removed from CallStack. Here in Node APIs section API starts it's execution in parallel to CallStack.
                                    4. Next statement (with zero sec) adds in CallStack. But as this is a Node API and not available in V8 engine, moves/registers to Node API section and finally gets removed from CallStack. Here in Node APIs section API starts it's execution in parallel to CallStack.
                                    5. After this assume, API with zero sec is completed. Thus it moves to CallBack queue, marking itself ready for execution. Ideally CallBack queue is the place where the operation resides and wait for execution immediately after CallStack complete it's all operations and becomes empty. This is all taken care by 'Event Loop', where it does not push any operation waiting in CallBack queue, unless CallBack becomes empty.
                                    6. Thus next statement comes to execute is 'Finishing App' in CallStack. Once it's completed main() statement moves out of CallStack.
                                    7. Now here 'Event Loop' finds empty CallStack, it moves first waiting operation in CallBack Queue to CallStack. This CallBack executes Console.Log ('Second CallBack') and then removes from CallStack.
                                    8. We still have one more operation running in Node API, which moves to CallBack queue after completion. Event Loop then moves this operation in Call Stack as in Step 7.
                                    9. Once all the operations are complete and every section - CallStack, Node API and CallBack Queue is empty, whole operation is marked complete.
                                    Step 1


                                    Step 2

                                    Step 3 (a)

                                    Step 3 (b)

                                    Step 3(c)

                                    Step 4(a)

                                    Step 4(b)

                                    Step 4(c)

                                    Step 5

                                    Step 6(a)

                                    Step 6(b)

                                    Step 6(c)

                                    Step 7(a)

                                    Step 7(b)

                                    Step 7(c)
                                    Step 8(a)

                                    Step 8(b)

                                    Step 8(c)


                                    Hope this helps!!

                                    Arun Manglick

                                    Saturday, November 25, 2017

                                    Cache Coherence..

                                    Overview

                                    In a shared memory multiprocessor system with a separate cache memory for each processor(CPU), it is possible to have many copies of shared data: One copy in the main memory and One in the local cache of each processor that requested it. When one of the copies of data is changed, the other copies must reflect that change, otherwise system will have further have data integrity issues/problems. This is resolved by a concept called as 'Cache Coherence'.

                                    Cache Coherence is the discipline which ensures that the changes in the values of shared operands(data) are propagated throughout the system in a timely fashion.

                                    Share Memory:  In computer hardware, Shared Memory refers to a (typically large) block of random access memory (RAM) that can be accessed by several different central processing units (CPUs) in a multiprocessor computer system. Below is an illustration of a shared memory system of three processors.


                                    Multi-Processing: Multiprocessing is the use of two or more central processing units (CPUs) within a single computer system.

                                    More Details:

                                    Consider two clients have a cached copy of a particular memory block from a previous read. Suppose the client on the above updates/changes that memory block, the client on the bottom could be left with an invalid cache of memory without any notification of the change. In such cases, Cache coherence is intended to manage such conflicts by maintaining a coherent view of the data values in multiple caches.


                                    More Technical

                                    We discussed, when multiple processors with on-chip caches are placed on a common bus sharing a common memory, then it's necessary to ensure that the caches are kept in a coherent state.

                                    Let's understand more technically the problem and solution using Coherence Cache.
                                    Here assume main memory has value '200' stored in it's location 'x'.

                                    Step 1: 
                                    • Processor_A reads location x. Copy of x transferred to PA's cache.
                                    • Processor_B also reads location x. Copy of x transferred to PB's cache too.


                                    Step 2:
                                    • PA adds 1 to x. x is in PA's cache, so there's a cache hit.
                                    • If PB reads x again (perhaps after synchronizing with PA), it will also see a cache hit. However it will read a stale value of x.


                                    Problem Resolution:

                                    This problem is avoided by adding 'Cache Coherence' hardware to the system interface. This hardware monitors the bus for transactions which affect locations cached in this processor.
                                    Here cache needs to generate 'Invalidate Transactions' when it writes to shared locations.

                                    I.e.
                                    • When PA updates x, the PA cache generates an Invalidate Transaction.(I.e. Simply communicating all the processors, the address of a cache line which has been invalidated) .
                                    • When PB's hardware sees the invalidate x transaction, it finds a copy of x in its cache and marks it 'Invalid'.
                                    • Now a read x by PB will cause a cache miss and initiate a databus transaction to read x from main memory.


                                    Invalidate Transaction:  Is an address-only transaction: it simply communicates the address of a cache line which has been invalidated to all the other processors.


                                    Further..
                                    • When PA's hardware sees the memory read for x (by PB), it detects the modified copy in its own cache, and emits a retry response, causing PB to Suspend the read transaction.
                                    • PA now writes (Flushes) the modified cache line to main memory.
                                    • PB later continues its suspended transaction and reads the correct value from main memory.


                                    Hope this helps!!

                                    Arun Manglick

                                    Thursday, April 20, 2017

                                    Git (Quick Commands)

                                    Configure Git for the first time
                                    git config --global user.name "Manglick, Arun"
                                    git config --global user.email "Arun.Manglick@xyz.com"

                                    Working with your repository
                                    I just want to clone this repository
                                    Simply clone this empty repository then run this command in your terminal.
                                    git clone

                                    Note: Clone command implicitly adds the origin remote for you.I.e.
                                    You need not to add git remote add origin if clone is already used.
                                    --------------------------------------------------------------------------------------
                                    Clone Code:
                                     From the repository in Bitbucket, click the Clone button & Copy Clone Path
                                     cd local-directory
                                     $ git clone ssh://git@bitbucket.example.com:7999/PROJ/repo.git

                                    Clone Specific Branch:
                                     git clone -b
                                     git clone -b master
                                     git clone -b onsite_branch
                                    --------------------------------------------------------------------------------------
                                    Push Code:
                                    cd existing-project
                                    git init
                                    git status [-s]
                                    git add --all
                                    git add
                                    git status

                                     $ git status -s
                                    M README - Modified files have an M
                                    A lib/git.rb  - After added to the staging area (After Commit)
                                    ?? LICENSE.txt - New files that aren’t tracked have a ?? next to them,

                                     Unstaging: Files are staged using above git add command.
                                    To unstage a file (to remove a file or files from the staging area):
                                    - git rm --cached  OR
                                    - git reset  
                                    - git reset --hard origin/branch_to_overwrite

                                     Undo:
                                    git reset did a great job of unstaging octodog.txt, but you'll notice that he's still there.
                                    Files can be changed back to how they were at the last commit by using the command:
                                    git checkout --
                                    git checkout -- octocat.txt

                                     Commit Staged Files as below:
                                    git commit -m "Initial Commit"

                                     --  So far local repo is created. Now to push our local repo to the GitHub server, we'll need to add a remote repo on GitHub
                                    (This command takes a remote repo name (e.g. origin) and a repository URL (e.g.https://github.com/try-git/try_git.git)
                                    (Git doesn't care what you name your remotes, but it's typical to name your main one origin)
                                    git remote add
                                    git remote add origin

                                     -- Now finally push our local changes to our remote repo...origin in our case.
                                    (The name of our remote is origin and the default local branch name is master)
                                    (The -u tells Git to remember the parameters, so that next time we can simply run git push and Git will know what to do)
                                    git push -u origin master
                                    ----------------------------------------------
                                    My code is already tracked by Git
                                    If code is already tracked by Git then set this repository as your "origin" to push to.
                                    cd existing-project
                                    git remote set-url origin
                                    git remote set-url origin
                                    git remote set-url origin

                                     git push -u origin master
                                    --------------------------------------------------------------------------------------
                                    Pull Code:
                                     cd existing-project
                                    git pull
                                    --------------------------
                                    cd existing-project
                                    git pull origin master

                                    -- Sometimes when you go to pull you may have changes you don't want to commit just yet.
                                    One option you have, other than commiting, is to stash the changes.
                                    Use 'git stash' to stash your changes, and
                                    Use 'git stash apply' to re-apply your changes after your pull.

                                    Use 'git stash drop' with the name of the stash to remove.
                                    Also you can run 'git stash pop' to apply the stash and then immediately drop it from your stack.

                                    --------------------------------------------------------------------------------------
                                    Undo:
                                     git checkout -- octocat.txt
                                    --------------------------------------------------------------------------------------
                                    Differences:
                                     There is a possiblity that three some additions and changes to repo family.
                                     Let's take a look at what is different from our last commit by using the git diff command.
                                     In this case we want the diff of our most recent commit, which we can refer to using the HEAD pointer.
                                     (The HEAD is a pointer that holds your position within all your different commits. By default HEAD points to your most recent commit,)
                                     git diff HEAD  OR
                                     git diff --staged

                                    Staged Differences
                                     Another great use for diff is looking at changes within files that have already been staged.
                                     Remember, staged files are files we have told git that are ready to be committed.

                                      git diff  -- That command compares what is in your working directory with what is in your staging area.
                                      git diff --staged  -- This command compares your staged changes to your last commit

                                    --------------------------------------------------------------------------------------
                                    Branching Out
                                    (When developers are working on a feature or bug they'll often create a copy (aka. branch) of their code they can make separate commits to. Then when they're done they can merge this branch back into their main master branch nd push it to the remote server)
                                    - git branch Branch_Apr

                                    Great! Now if you type git branch you'll see two local branches: a main branch named master and your new branch named  Branch_Apr
                                    - git branch

                                    (Switch between branches)
                                    - git checkout

                                    (Perform both things in one command)
                                    - git checkout -b Branch_Apr
                                    (Notice the phrase “fast-forward” in that merge)

                                    (To check HEAD is pointing to which branch)
                                    - git log --oneline --decorate

                                    (To see the last commit on each branch)
                                    - git branch -v

                                    (To see which branches are already merged into the branch you’re on)
                                    git branch --merged
                                      Branch_Apr
                                    * master

                                    (Pg 99- Because you already merged in Branch_Apr earlier, you see it in your list.
                                    Branches on this list without the * in front of them are generally fine to delete with git branch -d;
                                    As you’ve already incorporated their work into another branch, so you’re not going to lose anything)

                                    (To see which branches are not merged into the branch you’re on)
                                    git branch --no-merged
                                      Branch_Apr
                                    * master

                                    (To add branches created by someone else and you are not able to see those branches in your list)
                                    $ git remote update
                                    $ git branch -r
                                    ------------------------------------------------------------------------------------------
                                    Preparing to Merge
                                     Switching Back to master
                                     - git checkout master

                                    We're already on the master branch, so we just need to tell Git to merge the Branch_Apr branch into it:
                                    - git merge Branch_Apr

                                    Merging Issues: Two Ways:
                                    - Manual -
                                     - Manually Resolve those conflicts and (Pg -97 ProGit Book)
                                     - Then run "git add"" on each file to mark it as resolved.Staging the file marks it as resolved in Git.
                                    - Graphically - Use git mergetool
                                    - Finally after merge issue resolved - type "git commit" to finalize the merge commit
                                    - One more Finally - git push origin to finally push merged changes to git

                                    - Merging specific file)(s) between branches (Brutal Force Merge)
                                    Assume you are in master branch and want to merge from dev_i3 branch, use this syntax:--
                                    git checkout .     (To Merge Entire Branch content)
                                    git checkout
                                    git checkout dev_i3 views/shared/nav.cshtml
                                    (Ref Link: https://coderwall.com/p/nf4rqg/git-merge-a-single-file-from-one-branch-to-another)

                                    - Merging specific file)(s) between branches
                                    $ git checkout --patch branch2 file.py
                                    The interactive mode section in the man page for git-add(1) explains the keys that are to be used:
                                    http://stackoverflow.com/questions/18115411/how-to-merge-specific-files-from-git-branches

                                    y - apply this hunk to index and worktree
                                    n - do not apply this hunk to index and worktree
                                    q - quit; do not apply this hunk or any of the remaining ones
                                    a - apply this hunk and all later hunks in the file
                                    d - do not apply this hunk or any of the later hunks in the file
                                    g - select a hunk to go to
                                    / - search for a hunk matching the given regex
                                    j - leave this hunk undecided, see next undecided hunk
                                    J - leave this hunk undecided, see next hunk
                                    k - leave this hunk undecided, see previous undecided hunk
                                    K - leave this hunk undecided, see previous hunk
                                    s - split the current hunk into smaller hunks
                                    e - manually edit the current hunk
                                    ? - print help
                                    ------------------------------------------------------------
                                    Delete Branch (After Merge in Master)
                                     git branch -d to delete a branch.
                                     ($onist)

                                    Force delete
                                     - What if you have been working on a feature branch and you decide you really don't want this feature anymore?
                                     - You might decide to delete the branch since you're scrapping the idea.
                                     - You'll notice that git branch -d doesn't work.
                                     - This is because -d won't let you delete something that hasn't been merged.
                                     - You can either add the --force (-f) option or use -D which combines -d -f together into one command.
                                    ------------------------------------------------------------------------------------------
                                    Check Commit Summary:
                                    git log (To check commit history) OR
                                    git log --summary

                                    Showing Your Remotes
                                    git remote -v

                                    Inspecting a Remote
                                    git remote show origin

                                    Removing and Renaming Remotes
                                    git remote rm origin
                                    git remote rename origin myorigin

                                    Git Differences Tool:
                                    git difftool branch1 branch2
                                    git difftool branch1:file1 branch2:file1
                                    git diff --name-status branch1..branch2

                                    -------------------------------------------------------------------------------------------
                                    Git Stages:
                                    staged:
                                     - A place where we can group files together before we "commit" them to Git.
                                     - Files are staged using command: git add
                                     - To unstage a file (to remove a file or files from the staging area):
                                     - git rm --cached  OR
                                     - git reset

                                    unstaged:
                                     - Files with changes that have not been prepared to be committed.

                                    untracked:
                                     - Files aren't tracked by Git yet. This usually indicates a newly created file.

                                     deleted:
                                     - File has been deleted and is waiting to be removed from Git.


                                    Hope this helps.

                                    Arun Manglick

                                    Sunday, April 2, 2017

                                    REST vs SOAP

                                    Posted earlier long back in 2014 … Why REST - http://arun-ts.blogspot.com/2014/08/what-why-rest_6.html
                                    Here again an attempt to find buzz question REST vs SOAP .. J 
                                    Before this, understand REST underlying concepts: 

                                    REST Concepts are referred to as Resources.
                                    • Resources are manipulated by Components.
                                    • Components, request and manipulate Resources via a Standard Uniform Interface.
                                    • In case of HTTP, this interface consists of standard HTTP ops e.g. GET, PUT, POST, DELETE.
                                     Differences:
                                    REST vs SOAP is not the right question to ask. SOAP is a protocol. REST is an architectural style.

                                    SOAP stands for Simple Object Access Protocol
                                    REST stands for Representational State Transfer.

                                    SOAP is a protocol.
                                    REST is an architectural style. 
                                    REST has defined guidelines for creating services which are scalable. 
                                    REST used with HTTP protocol uses its verbs GET, PUT, POST and DELETE.

                                    SOAP transport protocol is HTTP only
                                    REST is protocol independent. It's not coupled to HTTP. Pretty much like you can follow an ftp link on a website, a REST application can use any protocol for which there is an standardized URI scheme.

                                    However REST is optimized for the web, due to its support for JSON, hence incredible popularity of REST over HTTP!
                                    SOAP uses services interfaces to expose the business logic.


                                    SOAP is focused on accessing named operations, each implement some business logic through different interfaces.
                                    REST uses Consistent/Standard URI to expose business logic. In case of HTTP, this interface consists of standard HTTP ops e.g. GET, PUT, POST, DELETE

                                    REST is focused on accessing named resources through a Standard Uniform/Consistent Resource Interface.

                                    SOAP defines standards to be strictly followed.

                                    REST does not define too much standards like SOAP
                                    SOAP defines its own security. e.g. WS-Security, WS-AtomicTransaction, WS-ReliableMessaging etd.

                                    RESTful web services inherits security measures from the underlying transport.
                                    SOAP requires more bandwidth and resource than REST (Due XML Based)
                                    REST requires less bandwidth and resource than SOAP
                                    (Due JSON Based)
                                    SOAP permits XML data format only
                                    REST permits different data format such as Plain text, HTML, XML, JSON etc
                                    SOAP based reads cannot be cached.
                                    REST has better performance and scalability
                                    REST reads can be cached.
                                    SOAP can't use REST because SOAP is a protocol.

                                    REST can use SOAP web services because it is a concept and can use any protocol like HTTP, SOAP.

                                    SOAP is less inter-operable way to implement client-server, as many environments still don't have SOAP toolkits. And some that do have toolkits are based on older standards that can't always communicate with toolkits that implement newer standards.
                                    REST is more inter-operable than SOAP. REST only requires an HTTP library to be available for most operations, and it is Certainly More Inter-operable Than Any RPC Technology (including SOAP).
                                      
                                    Fundamental REST Principles:

                                    • Client-Server Communication
                                      • Client-server architectures have a very distinct separation of concerns.
                                      • All applications built in the RESTful style must also be client-server in principle. 
                                    • Inter-operable:
                                      • Many people advertize SOAP as being the most inter-operable way to implement client-server programs. But some languages and environments still don't have SOAP toolkits. And some that do have toolkits are based on older standards that can't always communicate with toolkits that implement newer standards.
                                      • REST only requires an HTTP library to be available for most operations, and it is Certainly More Inter-operable Than Any RPC Technology (including SOAP).
                                    • Stateless
                                      • REST encourages each resource to contain all of the states necessary to process a particular client request.
                                      • Thus  server mcompletely understand the client request without using any server context or server session state.
                                    • Cacheable
                                      • Few Approaches to make Cacheable: Link1, Link2
                                        • Entity Tags (ETags) that don’t rely on shared agreement on time
                                        • The Last-Modified HTTP header, which is date-time-centric
                                        • The Vary Header
                                      • When RESTful endpoints are asked for data using HTTP, the HTTP verb used is GET.
                                      • Resources returned in response to a GET request can be cached in many different ways.
                                      • e.g. Cache constraints may be used, thus enabling response data to be marked as cacheable or not-cacheable. Any data marked as cacheable may be reused as the response to the same subsequent request. 
                                    • Uniform Interface
                                      • All components must interact through a single uniform interface.
                                      • Because all component interaction occurs via this interface, interaction with different services is very simple.
                                      • The interface is the same! This also means that implementation changes can be made in isolation.
                                      • Such changes, will not affect fundamental component interaction because the uniform interface is always unchanged. 

                                    Reference: http://stackoverflow.com/questions/19884295/soap-vs-rest-differences

                                    Hope this helps.

                                    Arun Manglick