Labels

Friday, September 3, 2010

Why REST?

Why REST?


Two reasons – One is soft and the other is hard( likely imposed).


1.    First, REST offers some significant features and benefits over RPC technologies in many cases.

2.    Second, Microsoft is moving many of its own implementations away from RPC technologies (such as SOAP) and goings toward REST. This means that even if you are not convinced or motivated to use REST to build your own systems, you'll need to know how to interact with other MS Frameworks & Technologies as they have already moved to REST,


Why Should You Care about REST?


For so long we have used either of the below two proprietary approaches.  These are the implementations of the client-server style we've had on the Microsoft platform.

·         RPC systems such as DCOM or .NET Remoting, or

·         Interoperable RPC technologies such as SOAP using ASMX(Web Service) or WCF,


So, apart from the two mentioned reasons, Why Learn Or Use Rest?


The following is a list of other advantages (but don't consider this list exhaustive):


Caching

When RESTful endpoints are asked for data using HTTP, the HTTP verb used is GET.

Resources returned in response to a GET request can be Cached in many different ways.


Conditional GET, which is a way that a client can check with the service if his version of the data is still the current version, is an optional implementation detail a RESTful endpoint can implement that can further improve speed and scalability.


Scale-Out

REST encourages each resource to contain all of the states necessary to process a particular request.

RESTful services are much easier to scale out when they fulfill this constraint and can be stateless.


Interoperability

Many people advertize SOAP as being the most interoperable way to implement client-server programs.

But some languages and environments still don't have SOAP toolkits.

And some that do have toolkits are based on older standards that can't always communicate with toolkits that implement newer standards.


REST only requires an HTTP library to be available for most operations, and it is Certainly More Interoperable Than Any RPC Technology (including SOAP).


Simplicity

Here, the simplicity of using REST relates to URIs representing resources and the Uniform Interface.


Using the uniform interface simplifies development by freeing me from having to build an interface, contract, or API for each service I need to build. The interface (how clients will interact with my service) is set by the constraints of the architecture.


Lightweight

REST is Lightweight than SOAP because it does not requires lot of xml markup like SOAP.


This is not an exhaustive list nor should you take it as conclusive evidence that REST is the one and only true technology to use always.

You should be aware of the advantages so you can leverage them when appropriate


REST Vs SOAP - Which is the best approach?


Software Architects have been involving a never-ending debate about whether SOAP-based or REST-style web services are the right approach.

Yahoo's web services are using REST and Google using SOAP for their web services. Some organizations have web services for both REST and SOAP.


REST is Lightweight than SOAP because it does not requires lot of xml markup like SOAP.

I believe that


·         SOAP will be the primary choice for Intranet & Enterprise Level Applications because SOAP and the WS-* specifications addresses many challenges of enterprise level applications such as Reliability, Distributed Transactions, and other WS-* services.

·         On the other hand, Internet applications will gear towards to REST because of REST’s explicitly Web-based approach and its simplicity.


Hope this helps.


Thanks & Regards,

Arun Manglick


Monday, August 30, 2010

Including Binary Resources in Silverlight

Resources (Image) can be added in three different ways:


In the Application Assembly (DLL)

·         Build Action – Content

·         Copy to Output Directory – Do not Copy


See Code 1 & 2.

In the Application Package (XAP)

·         Build Action – Resource

·         Copy to Output Directory – Do not Copy


See Code 3.

In the Silverlight Test Web Site Project

·         Must be placed in ClientBin Folder


See Code 4

In Separate SL Class Library Assemblies

·         Build Action – Resource

·         Copy to Output Directory – Do not Copy


See Code 5


Code


1

<Grid x:Name="LayoutRoot" Background="White">

            <Image x:Name="img" Source="Image_Resource.jpg"></Image>

</Grid>


2

<Grid x:Name="LayoutRoot" Background="White">

            <Image x:Name="img"></Image>

</Grid>


public Constructor()

{

            InitializeComponent();

            StreamResourceInfo sri = Application.GetResourceStream(new Uri("Resources;component/Image_Resource.jpg",

                                                UriKind.Relative));


            BitmapImage bitmap = new BitmapImage();

            bitmap.SetSource(sri.Stream);

            img.Source = bitmap;                

}


3

<Grid x:Name="LayoutRoot" Background="White">

            <Image x:Name="img" Source="/Image_Content.jpg"></Image>

</Grid>


4

<Grid x:Name="LayoutRoot" Background="White">

            <Image x:Name="img" Source="/Image_Webfile.jpg"></Image>

</Grid>


5

<Grid x:Name="LayoutRoot" Background="White">

            <Image Source="/ResourceClassLibrary;component/happyface.jpg"></Image>

</Grid>


Hope this helps.


Thanks & Regards,

Arun Manglick


Friday, August 27, 2010

Silverlight 3 Navigation: Navigating to Pages in referenced assemblies

In this post, I’ll look at some basic navigation functionality in Silverlight 3.  Silverlight 3 navigation is based on navigating a Frame control to a particular Page control.  On top of allowing non-linear navigation throughout your Silverlight application,


·         the Frame control will integrate with your browser’s history and address bar,

·         Allowing you to provide deep-links to Pages within your application and provide a more web-like experience within Silverlight applications.

·         Silverlight 3 navigation allows you to pass data through query strings, perform fragment navigation.


Basic navigation to pages in your main (application) project is simple – HyperlinkButtons can target a Frame, and specify the path to the Page’s XAML file, like so:


<navigation:Frame x:Name="ContentFrame" Source="/Views/Home.xaml">
</navigation:Frame>
<StackPanel>
    <HyperlinkButton NavigateUri="/Views/Home.xaml" TargetName="ContentFrame" Content="home"/>
    <HyperlinkButton NavigateUri="/Views/About.xaml" TargetName="ContentFrame" Content="about"/>
</StackPanel>


In this case, my Pages are “Home” and “About”, located in a Views folder within my Silverlight Application project.  Clicking on the links results in changes to the address bar in my web browser as below.


http://localhost:1556/Arun.Manglick.SilverlightTestPage.aspx#/Views/About.xaml


This navigation functionality is very valuable in and of itself, but what happens if I want to put my pages in a separate assembly, ripe for reuse in other applications?  You’ll notice that the URIs for the Pages were relative to the application project (i.e. “/Views/Home.xaml” represents “<ApplicationProject>/Views/Home.xaml”). 


If you want to access Pages in referenced assemblies, you can do so using the same “short” syntax: “/<ReferencedAssemblyName>;component/<PathToPage>/<PageName>.xaml

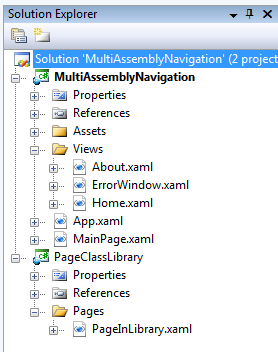
With this syntax, I can place (and reference) pages in a class library that will be referenced by my Silverlight application, allowing me to create a structure like the one in the image below (a simplified example, I know, but it does illustrate the point!).


Solution structure showing /Pages/PageInLibrary.xaml in a class library called PageClassLibrary


For this project structure, my hyperlinks look like this:

 
<navigation:Frame x:Name="ContentFrame" Source="/Views/Home.xaml">
</navigation:Frame>
<StackPanel x:Name="LinksStackPanel">
    <HyperlinkButton NavigateUri="/Views/Home.xaml" TargetName="ContentFrame" Content="home"/>
    <HyperlinkButton NavigateUri="/Views/About.xaml" TargetName="ContentFrame" Content="about"/>
    <HyperlinkButton NavigateUri="/PageClassLibrary;component/Pages/PageInLibrary.xaml"                                   TargetName="ContentFrame" Content="page in a class library"/>
</StackPanel>


Upon running and clicking on the “page in a class library” link, you’ll notice that the address bar shows a rather long and ugly URI:


http://localhost:1556/Arun.Manglick.SilverlightTestPage.aspx#/PageClassLibrary;component/Pages/PageInLibrary.xaml


UriMapper:


Thankfully, we’ve supplied a great feature for the Frame control that helps you deal with ungainly URIs – the UriMapper.  UriMappers allow you to write code that takes a URI as input and produces a different URI as output.  The output URI will be used to locate the page, while the input URI is what the user will see.  In the SDK, we’ve supplied a default UriMapper that allows you to use some basic pattern matching to map URIs and keep your deep-links nice and tidy.


In my case, I’d be quite happy if I could get rid of the “/PageClassLibrary;component" that I had to add to my URI to reference Pages in a class library altogether.  Instead, I’d like my URI to look like this: “/Pages/PageInLibrary.xaml”.  To accomplish this, I add a UriMapper to my Frame:


<navigation:Frame Source="/Views/Home.xaml">
    <navigation:Frame.UriMapper>
        <uriMapper:UriMapper>
            <uriMapper:UriMapping Uri="/Pages/{path}" MappedUri="/PageClassLibrary;component/Pages/{path}" />
        </uriMapper:UriMapper>
    </navigation:Frame.UriMapper>
</navigation:Frame>
<StackPanel>
    <HyperlinkButton NavigateUri="/Views/Home.xaml" TargetName="ContentFrame" Content="home"/>
    <HyperlinkButton NavigateUri="/Views/About.xaml" TargetName="ContentFrame" Content="about"/>
    <HyperlinkButton NavigateUri="/PageClassLibrary;component/Pages/PageInLibrary.xaml" TargetName="ContentFrame" Content="page in a class library"/>
    <HyperlinkButton NavigateUri="/Pages/PageInLibrary.xaml" TargetName="ContentFrame" Content="(mapped URI) page in a class library"/>
</StackPanel>


Now, users who navigate to the page are greeted with this, much “prettier” URL: http://localhost:1556/Arun.Manglick.SilverlightTestPage.aspx#/Pages/PageInLibrary.xaml


And there you have it!  Dividing your pages across multiple assemblies doesn’t have to degrade user experience, and once you’re familiar with the style of URI that the navigation framework expects for such pages, it’s no more complex than standard navigation within your Silverlight application.

One last thought…


Before I leave you, I think it’s important to point something out: the Silverlight 3 SDK ships with a project template for Navigation for Visual Studio.  This template makes it really easy to get started with a styleable, Navigation-enabled Silverlight application, and does quite a lot for you, including specifying some default UriMappings:


<navigation:Frame x:Name="ContentFrame" Style="{StaticResource ContentFrameStyle}"
                  Source="/Home" Navigated="ContentFrame_Navigated" NavigationFailed="ContentFrame_NavigationFailed">
    <navigation:Frame.UriMapper>
      <uriMapper:UriMapper>
        <uriMapper:UriMapping Uri="" MappedUri="/Views/Home.xaml"/>
        <uriMapper:UriMapping Uri="/{pageName}" MappedUri="/Views/{pageName}.xaml"/>
      </uriMapper:UriMapper>
    </navigation:Frame.UriMapper>
</navigation:Frame>


However, if you look closely at the UriMappings, you’ll notice that “/{pageName}” will match our “/<AssemblyName>;component” syntax, mapping it to something else entirely, and preventing any attempts to link directly to such URIs.


There are a number of ways to address this issue, depending on your desired URI scheme, such as:

  • Delete the UriMappings entirely and go back to the full paths for all of the hyperlinks
  • Modify the existing UriMappings so that the “catch-all” doesn’t match the desired syntax
  • Add UriMappings for each referenced library before the catch-all mapping, like so:


<navigation:Frame x:Name="ContentFrame" Style="{StaticResource ContentFrameStyle}"
                  Source="/Home" Navigated="ContentFrame_Navigated" NavigationFailed="ContentFrame_NavigationFailed">
    <navigation:Frame.UriMapper>
      <uriMapper:UriMapper>
        <uriMapper:UriMapping Uri="" MappedUri="/Views/Home.xaml"/>
        <uriMapper:UriMapping Uri="/Pages/{path}" MappedUri="/PageClassLibrary;component/Pages/{path}" />
        <uriMapper:UriMapping Uri="/{pageName}" MappedUri="/Views/{pageName}.xaml"/>
      </uriMapper:UriMapper>
    </navigation:Frame.UriMapper>
</navigation:Frame>
 
 
  • Add a UriMapping to restore the original syntax before the catch-all mapping, like so:


<navigation:Frame x:Name="ContentFrame" Style="{StaticResource ContentFrameStyle}"
                  Source="/Home" Navigated="ContentFrame_Navigated" NavigationFailed="ContentFrame_NavigationFailed">
    <navigation:Frame.UriMapper>
      <uriMapper:UriMapper>
        <uriMapper:UriMapping Uri="" MappedUri="/Views/Home.xaml"/>
        <uriMapper:UriMapping Uri="/{assemblyName};component/{path}" MappedUri="/{assemblyName};component/{path}" />
        <uriMapper:UriMapping Uri="/{pageName}" MappedUri="/Views/{pageName}.xaml"/>
      </uriMapper:UriMapper>
    </navigation:Frame.UriMapper>
</navigation:Frame>


This list is certainly not exhaustive, but some combination of these options is likely to help you re-enable navigation to Pages in referenced assemblies.

If you’re still having trouble getting this to work, let me know, and I’ll try to help you troubleshoot!


Thanks & Regards,

Arun Manglick


Tuesday, July 13, 2010

Mask Competition - Winner

My son, came first in the ‘Mask Competition’.


Cheers!
Arun  

Monday, June 21, 2010

Silverlight - Startup Sequence

Application Events


1.    The user requests the HTML entry page in the browser.

2.    The browser loads the silverlight plug-in. It then downloads the XAP file that contains your application.

3.    The Silverlight plug-in reads the AppManifest.xml file from the XAP to find out what assemblies your application uses. It creates the Silverlight runtime environment  and then loads your application assembly (along with any dependent assemblies).

4.    The Silverlight plug-in creates an instance of your custom application class (which is defined in the App.xaml and App.xaml.cs files).

5.    The default constructor of the application class raises the Startup event.

6.    Your application handles the Startup event and creates the root visual object for your application.


From this point on, your page code takes over, until it encounters an unhandled error (UnhandledException) or finally ends (Exit).


These events– are the core events that the Application class provides


·         Startup,  

·         UnhandledException, and

·         Exit


Along with these standards, the Application class includes two events– that are designed for use with the out-of-browser applications


·         InstallStateChanged and

·         CheckAndDownloadUpdateCompleted


Regards,

Arun Manglick

Tuesday, June 8, 2010

C# 4.0 - Optional Parameters and Named Arguments

This post covers two new language feature being added to C# 4.0 – Optional Parameters & Named Arguments.


Optional Parameters


·         C# 4.0 now supports using optional parameters with methods, constructors, and indexers (note: VB has supported optional parameters for awhile).

·         Parameters Are Optional When A Default Value Is Specified as part of a declaration. E.g.


public void SendMail(string toAddress, string bodyText, bool ccAdministrator = true, bool isBodyHtml = false)

{

    // Full implementation here

}


Now the call could be made as:


email.SendMail("bob@foo.com", "Hello World");

email.SendMail("bob@foo.com", "Hello World", true, false);


Note: But this approach will not let you pass the value for 4th parameter - isBodyHtml and utilize optional feature for the 3rd one. Here comes the usage of Named arguments.


Named Arguments:


·         C# 4.0 also now supports the concept of “named arguments”. 

·         This allows you to explicitly name an argument you are passing to a method – instead of just identifying it by argument position.


·         This enables us to call the above method as: Let you pass the value for 4th parameter - isBodyHtml and utilize optional feature for the 3rd one


email.SendMail("bob@foo.com", "Hello World", isBodyHtml: true);


Overall, it’s by no means an earth shattering feature that is being added to the language in stand-alone scenarios


Reference : Link


Hope this helps.

Arun Manglick